Month: December 2012

The more awake bright psychedelic orange!

Or at least that’s what google translate says is the name of the rimmel nail polish I have from Japan…

I returned to my grey polish but thought this time I would brighten things up with some bright orange dots and an accent nail with the colours reversed.

It was a simple but fun and effective manicure which I was very happy with. I always feel pleased when I manage to create something nice using only the dotting tool – it gives me hope that even beginners can create beautiful nail art!

Before writing this post I thought it was time I found out the name of the orange I used. It was one I got in japan but it was Rimmel so I thought i’d just be able to put the number in and find out the name in English. Turns out there’s no “speedy finish” collection outside Japan, so I had to look it up on the Japanese Rimmel site. I worked out the part in katakana (Japanese ‘alphabet’) which says psychedelic orange, but needed some help from google translate for the string of kanji at the beginning. It came out as: the more awake bright psychedelic orange. (or
目が覚めるほど 鮮やかなサイケデリックオレンジ if you can read Japanese)

So… I used: Miss Grey – Gosh, The more awake bright psychedelic orange – Rimmel (Japan)

20121221-184521.jpg

Decorated V-shaped French

I wanted to do something a bit more elegant than usual and decided on a V-shaped French manicure. I chose quite neutral colours rather than my usual brights which was nice for a change. Once I’d done the v-shapes i was worried it looked a bit boring so i added the dots to create a beaded look and to make it a bit more fun.

I think it was a good choice and it didn’t spoil the elegant look, so it was a good compromise between fun and stylish!

I used: Pure Pearl – Revlon, Kalahari Kiss – China Glaze, Black Passion – Gosh

20121220-233649.jpg

Starburst

I wanted to try using tape again and found this stunning pop-art style explosion design by nailside which I really loved.
Unfortunately my Internet decided to die that day and I couldn’t actually look at the tutorial while trying to do the manicure. I was going to wait until another day but thought I’d try a simplified version as I had a vague memory of what the taping involved.
My memory wasn’t quite as good as I thought and my starbursts didn’t look half as good or even as the ones in the tutorial.
I still liked what I ended up doing and I think it was more successful than my last attempt at using tape.

20121218-222928.jpg

On this manicure I also discovered Essie’s Good to Go quick dry topcoat which looked much nicer than the topcoat I’d been using previously and dried so much quicker – no more smudging my work after waiting patiently for a couple of ours only to discover it still wasn’t dry!

I used: Sensation – Color Addict, Stylenomics – Essie

Squares

I’m sure there must be a name for this kind of pattern and I know once someone tells me what it is I’ll feel pretty stupid for not being able to recall it, but for the moment I can’t put my finger on what to call it!

Anyway, I’d seen this design done many time and it looked simple enough to do, plus another’s chance to practise with using tape. I didn’t follow a tutorial for this one as it was fairly obvious how to do it but here’s a slightly different version which I really like by Spektor’s Nails

I used: Matte Aqua – BYS, Green – Sweets Sweet

20121220-101047.jpg

Also, has anyone seen the brand Sweets Sweet outside Japan? I really love this glittery green and am going to be very sad when it finally runs out and I can’t get any more of it. If anyone’s seen it in Europe please let me know, or if you have a suggestion for another equally nice sparkly green I’d be happy to hear it!

Drips

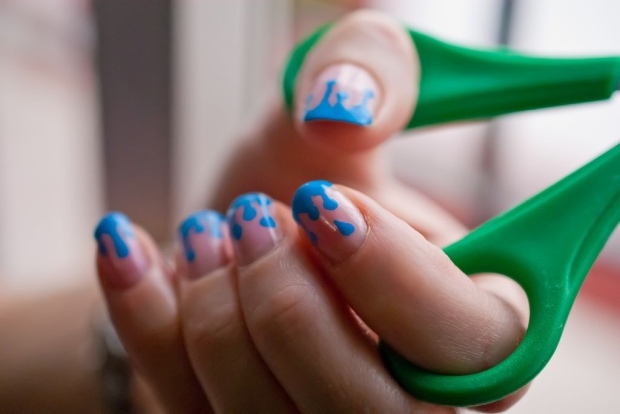
After seeing several fun dripping paint manicure tutorials I thought I’d give it a try. I thought I’d try and make them look like water drops rather than dripping paint, so I used what is rapidly becoming my most used colour: Matte Aqua by BYS.

The basic idea was easy but getting it looking just right was more of a challenge. I absolutely loved the gorgeous version on the tutorial video I followed by juliatmll but aimed for something a little simpler for a first try and was pretty happy with the result.

I used: Matte Aqua – BYS, Baby pink – Sweet Closet

20121217-221640.jpg

Fishtail

Several bloggers I follow did fishtail or braid nail art over the course of a couple of weeks and almost all of them mentioned how it was a simple one to do. As they all looked so stunning, I decided to give it a go. I followed the tutorial provided here by Rebecca likes nails

I was really pleased with the results and got loads of compliments!

20121216-233804.jpg

I kind of wish I’d been a bit neater about it and made it look as stylish as this one by work/play/polish and maybe tried doing the taped version of the fishtail instead, but as I’m still not that great at getting things right with tape maybe this was a safer and easier option, and I do love the result.

I used: Ocean – BYS, Black Passion – BYS, Yellow – Sweets Sweet

Grey and dark purple spots

I have a student who always looks really chic and well dressed and I’ve noticed that 90% of the time she has her nails painted grey. I’d seen the grey nail trend happen in magazines but until I actually saw it on someone, didn’t realise quite how stylish it could look.

Anyway, I’m not sure I can carry off the chic look like my glamourous student, so I decided to do something a bit more fun with my grey manicure and add some dark purple dots to it.
I liked the result and found it just stylish enough for me without being too serious!

I used: Miss Grey – Gosh and Jungle Queen – China Glaze

20121213-231137.jpg

My first stamp

I’d been thinking about buying a stamping kit off amazon or eBay for a little while, but on a trip down to Malaga I found a shop which sold a different kind of stamp. Unlike the other stamps where the designs are on metal plates, these ones had the designs directly in the rubber stamp. I guess the downside to them is that maybe they won’t last as long as the traditional metal plates. They were pretty cheap though, so I decided to give them a go.

I started simple and just did one single coloured stamp on each nail. It was easy to do, but I can see that to get them looking really perfect requires some practise. Definitely a fun way to add some interest to your nails quickly but don’t have the time or energy for anything more complicated!

I used: Kalahari Kiss – China Glaze, Ocean – Gosh and nail stamp by Nailxpress

20121212-093251.jpg

Pink swirls

I wanted a really girly feeling manicure so I decided to use two different shades of pink and try to create a simple swirly shape on each nail. These were meant to look soft and dreamy and not too perfect, so I used a medium size brush to paint the swirls and didn’t worry about them looking even or the same on each nail.

20121211-105612.jpg

I quite like the result, although the pale pink was much more translucent over the dark pink than I had imagined and it needed several coats so the swirls ended up looking even chunkier and less neat than I had imagined! In this manicure I don’t think it spoilt the overall look though.

I used: Sensation – Color Addict, Baby pink – Sweet Closet