taped nail art

GOT Polish: Purple

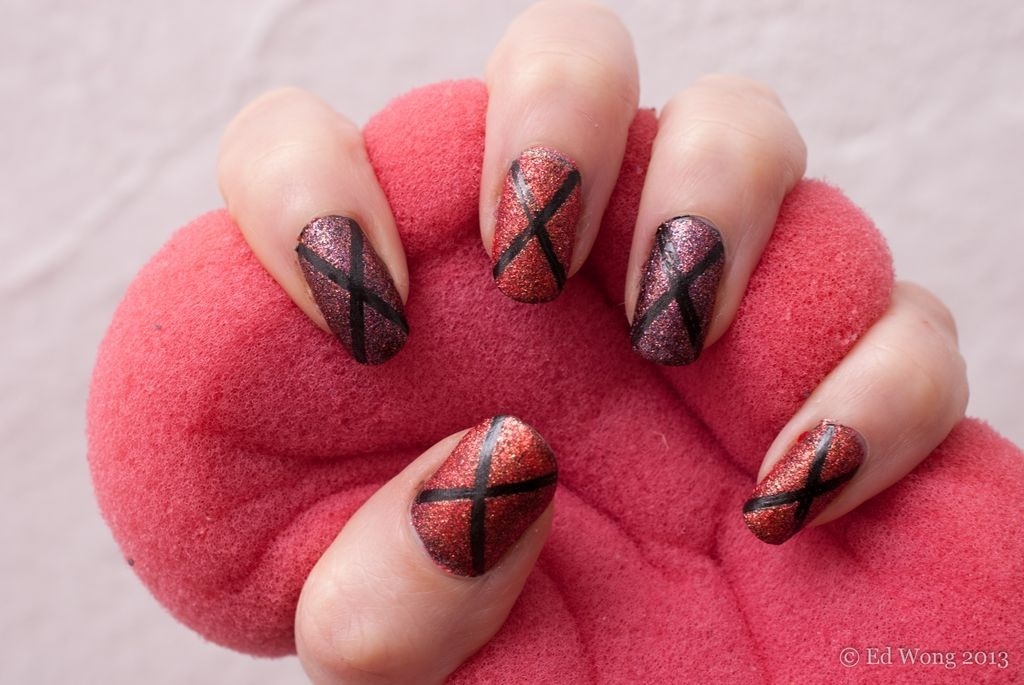
Can you believe I got the tape out again!?! Two manis using tape in one week is unheard of for me! I’m proud of myself for keeping on trying with tape. I tend to have more success with striping tape than normal stationery tape and get slightly cleaner lines.

I also find sponging over tape to be less messy, stressful and likely to lead to disaster than painting over it. I liked the idea of a regular looking crisscross pattern rather than random laser line taping this time and am pretty pleased with the result. My tape lines are still not perfect but they’re not looking too bad!

20140314-004318.jpg

I used : Holland Park Road – Nails Inc, Impulsive – Revlon, Do You Lilac It? – OPI, My Boyfriend Scales Walls – OPI

Tri Polish Tuesday: Green, Purple and Blue Colour Blocks

I made a promise to myself to try and get over my issue with using tape. I’ve never been very good at it, had a couple of disasters and generally don’t like the fiddliness of it. However I also know that taped manis can be absolutely stunning and I’m often wowed by what other people can create with tape, so it’s time for me to learn to love tape.
I thought colour blocks would be a good place to start and found this beautiful mani on Pinterest which I thought I’d try to recreate.
I was patient beyond what I thought I was capable of, as this required taping twice to create the design. My patience meant that the tape didn’t destroy my base colour, however I’m not sure if it was crappy tape or just my technique but I still ended up with far from crisp lines which I ended up fixing with a striping brush. So this turned out to be a mix of free handing and taping to get the effect I wanted.
I still have a long way to go if I’m ever going to love using tape, but plan to try at least one taped mani a week until I master it (or tear my hair out in sheer frustration!!!)
I quite like the result , especially with the matte top coat.

20140312-004528.jpg

I used: Do You Lilac It? – OPI, Southwark – Nails Inc, Knightsbridge Green – Nails Inc, Lady in Black – OPI

Couture Nail Art Challenge: Inspired by L’Wren Scott

I love L’Wren Scott’s designs so much that I could do a month’s worth of nails inspired by her! So it was really difficult to choose one design to base my manicure around for this day of the challenge. These dresses screamed nail art to me though, with their vertical stripes and black or white zigzag shapes.
I painted the stripes in with a medium sized striping brush and then used tape to create the black or white zigzags over the stripes.

I felt pleased with this design, it was fun but not too in your face – I’ll be sad to take this one off!

20130518-192853.jpg

I used: My Boyfriend Scales Walls – OPI, French Quarter For Your Thoughts – OPI, Black Taxi – Nails Inc.

Laser Striping Tape

It was kind of strange not having a theme to follow after the April challenge finishing, so I decided to do something simple and return to trying to get perfectly straight lines with striping tape!

I waited much much longer for the base colour to dry this time and the results were much better than my previous attempts at using striping tape. So, as with just about everything in nail art, I’ve learnt that patience is the answer.

I also used two really beautiful colours so that probably helped this manicure to look great!

20130502-234547.jpg

I used: Draycott Terrace – Nails Inc, Tristam – A England

Textured nails with an X

I was given a 20% discount voucher for Kiko, an Italian cosmetics shop which I had walked past a couple of times but never been in, so I decided to investigate. Their products were pretty cheap (3,90€ or 4,90€ for nail polish) and I noticed they had their own range of textured nail polishes which I’ve been curious about trying but not sure that I want to spend a lot of money on in case I hate them. So I bought 3 from Sugar Mat range to see what I thought.

I put a layer of black down first and then painted a think coat of the textured polish over the top. It covered fairly well and didn’t take too long to dry. I’m still not sure about the whole texture thing. When I finished I did think it just looked like a very heavy matte glitter polish, but it kind of grew on me and I’m looking forward to trying the blue I got at some point soon. Also I chose polishes which had a bit of sparkle in them, so that might be the reason I thought they just looked like glitter polishes. Kiko also have kind of matte creme textured polishes in their Sugar Mat range but somehow they didn’t appeal to me as much as the shimmery ones. Maybe I’ll try one in future when I’ve got my head around the textured nail polish trend a bit more.

20130306-221837.jpg

I used: Black Passion – Gosh, Golden Mandarin – Kiko, Burgundy – Kiko.

Starburst

I wanted to try using tape again and found this stunning pop-art style explosion design by nailside which I really loved.
Unfortunately my Internet decided to die that day and I couldn’t actually look at the tutorial while trying to do the manicure. I was going to wait until another day but thought I’d try a simplified version as I had a vague memory of what the taping involved.
My memory wasn’t quite as good as I thought and my starbursts didn’t look half as good or even as the ones in the tutorial.
I still liked what I ended up doing and I think it was more successful than my last attempt at using tape.

20121218-222928.jpg

On this manicure I also discovered Essie’s Good to Go quick dry topcoat which looked much nicer than the topcoat I’d been using previously and dried so much quicker – no more smudging my work after waiting patiently for a couple of ours only to discover it still wasn’t dry!

I used: Sensation – Color Addict, Stylenomics – Essie